How to Install an Awning onto a Brick Wall
July 20, 2022
Summer is most definitely here – as the recent heatwave would indicate – so you may be thinking about purchasing an Awning and perhaps even installing it yourself.
At Blind Technique, we would encourage all our customers to find a reputable supplier who has extensive experience with how to install an awning – as its quite a specialised undertaking, as this blog will outline this week.
Why it is best to trust the experts when thinking about how to install an awning
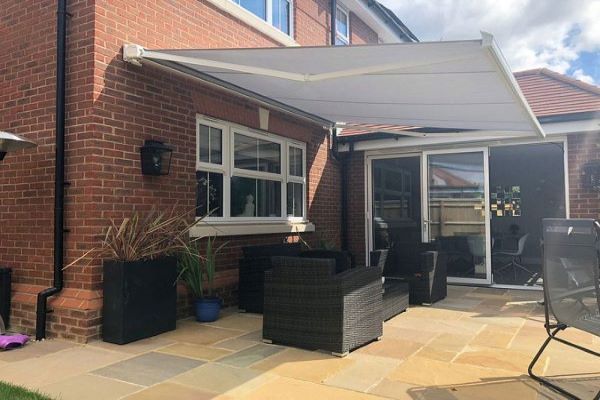
The first thing to realise is an awning is both a large and a heavy piece of outdoor furniture which must be installed correctly so the fabric is not held taut nor the brackets put under undue pressure for both home safety and for you to enjoy your new awning for years to come. The large fabric component can take on considerable force – even in light winds – so precise installation is key to securing those brackets and fixings into a wall or indeed, alternative suitable surface.
Due to these example reasons Blind Technique would always recommend fitting of your tailor-made awning ourselves by our own team of friendly and professional installers who are experts within the field of awning installation. Trust the team at Blind Technique when it comes to just how to install an awning – its what we do everyday and it is also what we do best!
How to install an awning – The Blind Technique way
- We determine the exact position of the awning – both lateral and vertical
- We decide where to fit the brackets and then drill the necessary holes are required
- We work on as neat and tidy basis as we can during the installation – such as vacuuming to eliminate the brick dust generated by drilling
- HILTI chemical fixing is piped into the holes just drilled as we know that simply screwing the brackets to the chosen surface (such as a wall) will not be enough
- Bolts are inserted into the hole where the HILTI product has been applied. This action secures the bolt ready for the bracket to be secured
- The awning bracket (which the awning is later fitted to) is secured and bolted into place
- We then fit the awning onto the wall mounted brackets. The heavy nature of the awning means you need an expert installer who has correctly positioned the brackets and that they are perfectly level. The awning should fit easily into the brackets and then be ready for final adjustments, prior to completed install
- Our team will then explain exactly, step by step, how the awning operates, plus offer our tips on best practice and mistakes to avoid when using it
- We ensure all our customers are fully satisfied with our installation and then we finalise the small amount of paperwork to complete our visit to you
- Your awning is now fully and professionally installed for you, with complete peace of mind so you can just enjoy the benefits it offers.
If you still have questions about how to install an awning or how we would do it, why not book a FREE Home Appointment for surveying with one of our friendly and professional sales advisors? We can outline just what to expect on the day and why it really does pay to instruct a professional to install it for you.
Awnings – both fabrics and brackets – are heavy and can present safety concerns if they are not installed correctly, so why take the risk? Invest in a perfectly crafted AND installed new piece of outdoor furniture when all there is left for you to do is to operate it and enjoy using it, with confidence.
The Blind Technique offer includes:
- A full range of retractable awning suitable for both domestic and commercial use
- The choice of cassette, semi cassette or no cassette
- The option of motorised or manual control
- A range of extras such as sensors, lighting and heating options
- Our expert installation service plus guarantee
So, the best way to discover how to install an awning?
Watch the expert installers at Blind Technique install yours with ease.